
We are not always able to handle a client's matter on the spot. Sometimes we have to put in quite an effort to get back in touch with them.
How do you plan the next client contact so nothing slips through the cracks? What do you do to remember every scheduled call? How do you keep track of all the emails with offers you scheduled for next Wednesday?
In today's article, we want to show you how you can use Sugester to schedule follow-up contacts with clients and, most importantly, not forget about them. It does not matter whether you schedule a call for next week, next month, or in six months - when the client's subscription is about to expire.
Discover a few simple methods that will help you stay on top of all your upcoming client contacts.
There are several options in Sugester - you can add a note to a client, create a new activity, or save the next item to your TODO list. But the best method, which we always recommend to our clients, is to create a custom field on the client card and fill it in every time you schedule a follow-up contact with a client.
Why a custom field?
First of all, it is immediately visible on the client card without having to dig into the details. Moreover, you can personalize custom fields and store any data you need for client management.
And secondly, you can easily search and sort data by this field later, which reduces the time needed to find all the contacts you need to call, for example.
So how do you activate a custom field in Sugester?
It is very simple - just open a client for editing and scroll to the very bottom of the form, where you will find the Add custom field button.
Then enter the field name, e.g. "Next contact", and in the field type, select "Date and time". This is important. With this setting, you will be able to pick the exact date and time of the client contact from a calendar. The information added this way will be displayed in the client profile and you can proceed from there.
![]()
Once you have saved in the CRM that a client asks you to contact them in a month at 1 pm, it would be great to actually reach out at that time.
To find all clients you need to contact, use our advanced search in clients. You can freely manage the time range in this search. If you want, the system will show you only the clients you need to contact today, or all clients you need to call this week. Everything depends on the filters you set in the search.
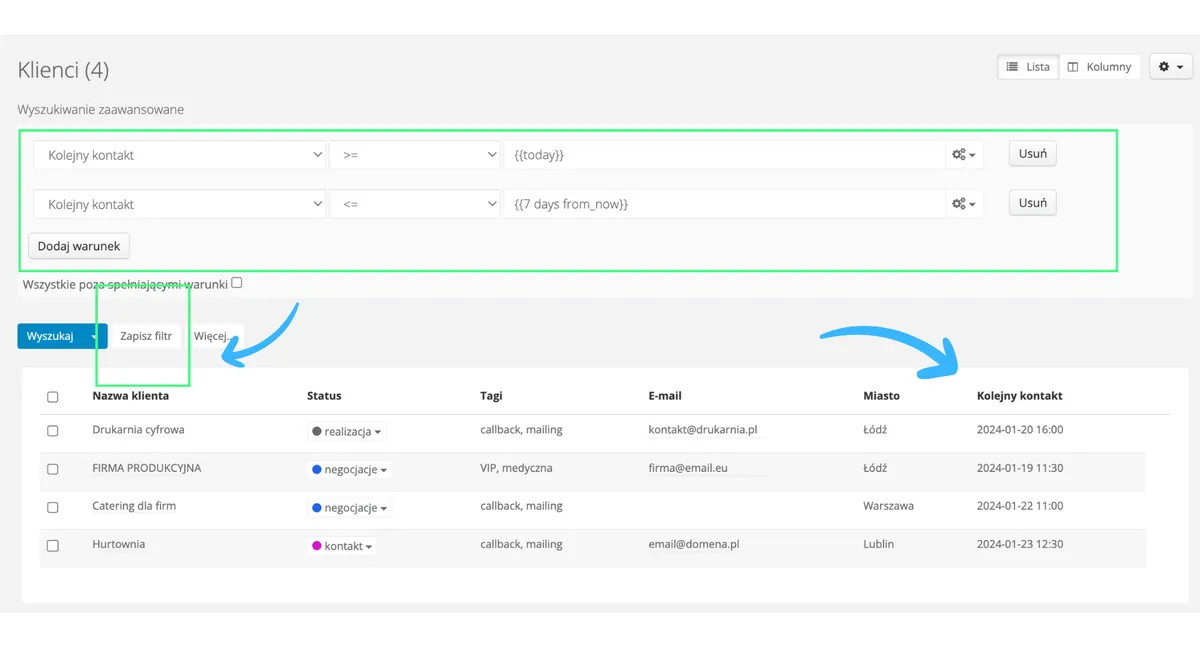
Let's say it's the beginning of the week and you want to check how many contacts you have planned for this week. Just go to the Clients tab, open Advanced search and add conditions like in the example below:
Two conditions are needed because we are defining a time range. Of course, in the second condition you can freely change the number "7" depending on the time range you want to check (e.g. contacts for the next 2 weeks, month, etc.).
What is important and at the same time very convenient is that you can save this filter. This means that tomorrow or the day after you will not have to run the search again - just open the saved filter and the system will show you the results.
Remember also that for this search to work at all, the custom field "Next contact" must always be filled in.
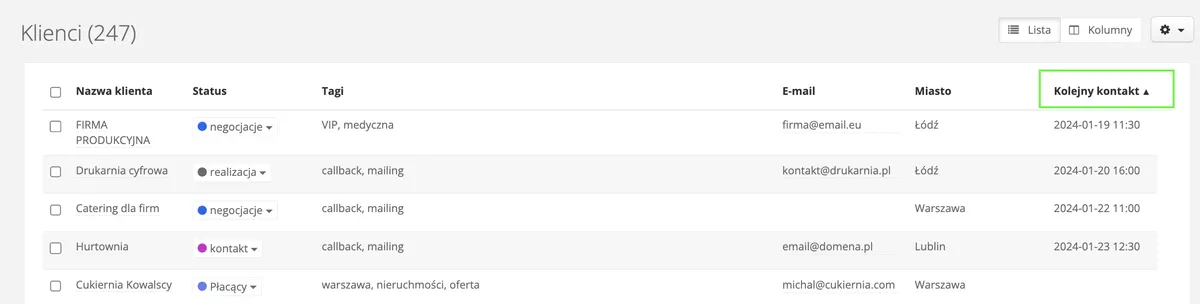
And if you do not need all the data for the whole week at once, but just want to quickly check who needs to be contacted each day, you can use regular sorting in the CRM.
All you need to do is set the "Next contact" column to be displayed in the client list. Just go to the settings icon on the right side of the list and in Display options check the box next to "Next contact". You can also immediately set where this column should appear in the list. Maybe the most convenient place for you is right after the client's contact details?
With the next contact column in the list, just click once on the header to sort data in ascending order. This means - if you have any contact scheduled for today - those clients will appear at the top of the list.

The method described below works both when you have already exchanged several emails with a client and simply want to follow up because contact has dropped off, and when you have specifically agreed with a client on sending an offer, for example.
For setting up follow-ups or reminders to send an email, use the Send and remind function.
When sending an email to a client, instead of "send" click Send and remind. You will be able to set a reminder for 3 days, a week (as the system suggests), or for any date you choose from the calendar (Send and remind…)
Besides sending the email, Sugester will also move the sent message to the "Pending" folder in your inbox. The message will wait there and reappear in your inbox exactly when you chose to remind yourself to follow up with the client.
You can also check the "Pending" folder at any time to see what email sends are scheduled. The bottom date shows when the email will return to your inbox. At that point, the message title will be in bold and a clock icon will appear on the left side, reminding you to follow up on that email.
Finally, here is a way for the system to remind you of a recurring client contact, for example to collect an order.
It will come as no surprise that we recommend using tasks for this. Not regular tasks, though, but recurring tasks. With them, every repetitive action you perform can be saved in the system so it will remind you. And it does not have to be only a client contact - it could be a monthly report, a weekly status, etc.
Recurring tasks can be found in Account Settings, under the Automation -> Recurring tasks tab.
If you call a client once a month to collect orders and need to set up a task for this, just click Add recurring task and fill in the form.
Done! Exactly one month from the date of creating the recurring task, a reminder about contacting the client will appear in the system. Look for it in your inbox. The task will be displayed in green, like other tasks in Sugester.
You will also be able to see all your recurring tasks by opening the calendar in Sugester.
In that case, all you need to do is create a recurring task based on a saved advanced search filter (as described in point 2).
Before you start, remember one important thing. In this example, we are using data from saved deals in the system - specifically the deal end date. This means that for everything to work correctly, you must always have the End date field in the deal filled in. Otherwise, the system will have no data to pull for the search filter.
Here is how to set up a recurring task based on a saved advanced search filter. Even though the filter concerns deals, we will do this from the Clients tab (which is perfectly correct):

Once you save the task, if there are already clients in your database whose subscription expires in exactly 2 days - the task will immediately appear in your inbox.

After opening the task, you will see a list of all clients whose subscription expires in 2 days. You can start calling them right away!
